Understanding Google Service Area Business Listings
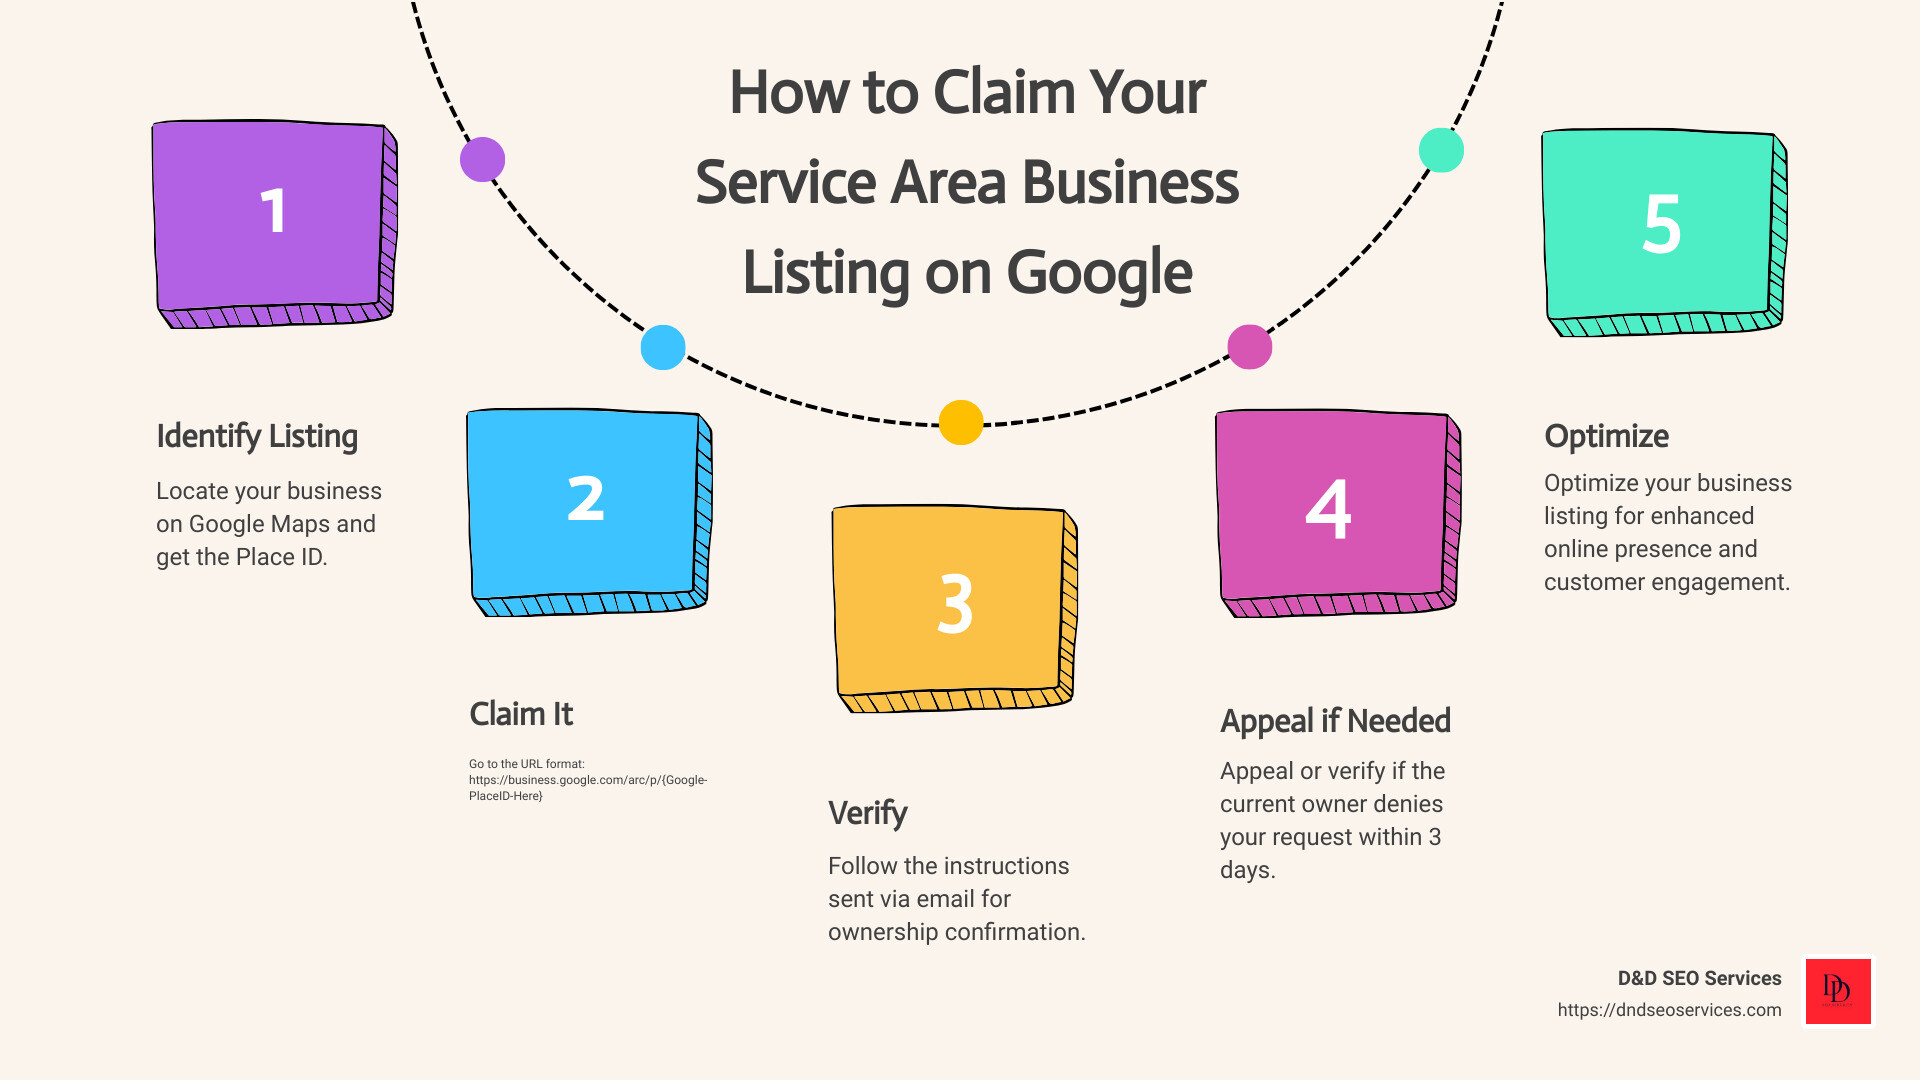
If you’re seeking The Easiest (Advanced) Way To Claim A Service Area Business Listing On Google, you’re in the right place. Here’s a quick overview to get you started:
- Identify the Listing: Locate your business on Google Maps and get the Place ID.
- Claim it: Go to the URL format:
https://business.google.com/arc/p/{Google-PlaceID-Here}. - Verify: Follow the instructions sent via email for ownership confirmation.
- Appeal if needed: Appeal or verify if the current owner denies your request within 3 days.
Claiming your service area business listing on Google is crucial for appearing prominently in local search results. Studies show that less than 1% of users click to the second page of Google results, so having your business on the first page can significantly increase visibility and customer foot traffic.
When you claim, verify, and optimize your Google My Business (GMB) listing, your business benefits by:
- Improved Online Presence: Appear in Google Maps and Google Search.
- Increased Trust: Respond to reviews and engage with customers.
- Targeted Local Reach: Highlight your service areas to attract nearby customers.
I’m Danielle Birriel, founder of D&D SEO Services, with over a decade of experience in local SEO. My focus is on empowering small businesses to thrive online. Let’s dig into the details of how to claim your service area business listing on Google.
Handy The Easiest (Advanced) Way To Claim A Service Area Business Listing On Google terms:
- get your website listed on google
- local business listings
- foursquare business listing
Method 1: Claim and Create Your Listing
Step-by-Step Guide
Claiming your business on Google is the first step to making it visible in local searches. Here’s a simple guide to help you through the process:
1. Go to Google Business Profile
Start by navigating to the Google Business Profile page. Sign in with your Google account. If you don’t have one, create it—it’s free and easy.
2. Enter Business Details
Once signed in, you’ll need to enter your business details. Type your business name into the search bar. If it appears, select it. If not, you’ll see an option to “Create a business with this name.” Click on it.
3. Fill Out the Business Information
Provide accurate and up-to-date information about your business. This includes:
- Business Name: Use your official business name.
- Address: Make sure your address is consistent with other online listings.
- Phone Number: A local phone number works best.
- Website URL: If you have a website, include it.
4. Choose a Category
Selecting the right category is crucial. Your primary category should best describe your business. You can add secondary categories to cover additional services. For example, if you are a landscaper, your primary category might be “Landscape Designer,” and additional categories could include “Landscaper” and “Garden Designer.”
5. Set Your Service Area
If you provide services outside your business location, select “Yes, I also serve them outside my location.” This allows you to specify the service areas you cover.
6. Verification Process
Google needs to verify that you are the rightful owner of the business. Here are the common methods:
- By Mail: Google sends a postcard to your business address with a verification code. This can take 1-2 weeks. Once you receive it, log in to your Google Business account and enter the code.
- By Phone: For eligible businesses, you can verify via phone. Google will call you with a verification code.
- By Email: Sometimes, you can verify by email. Google will send a code to your registered email address.
- By Video: Recently, Google has introduced video verification. This involves a live or recorded video showing your business location and operations.
7. Confirm Verification
After entering the verification code, your business will be verified, and your profile will be live on Google.
Pro Tip: While waiting for the verification postcard, do not edit your business information. Any changes might delay the verification process.
By following these steps, you’ll successfully claim and create your Google Business Profile, setting the stage for better visibility and customer engagement.
Next, let’s look at how to set your service area to ensure customers in your target locations can find you easily.
Method 2: Set Your Service Area
How to Set Service Areas
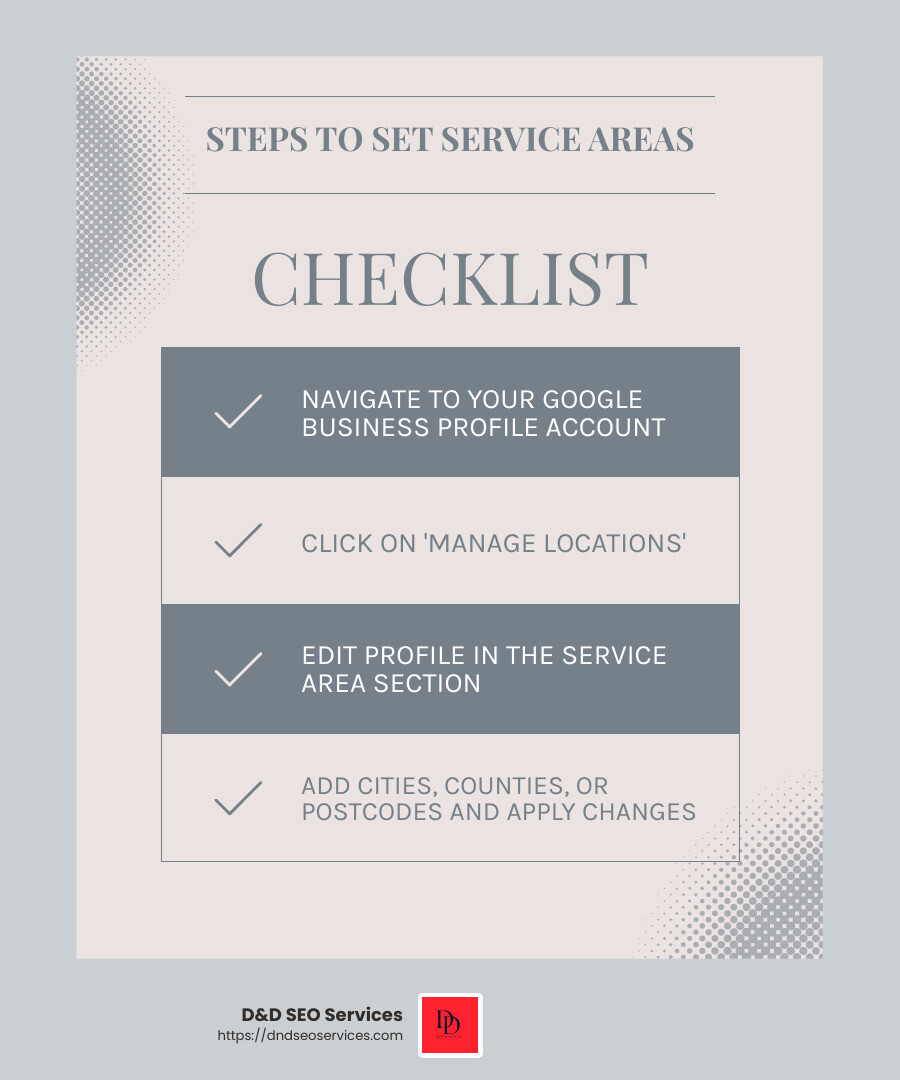
Once your Google Business Profile is claimed and verified, the next step is to define your service area. This ensures that customers in your target locations can find you easily. Here’s a step-by-step guide to setting your service area:
1. Go to Your Google Business Profile Account
Start by navigating to your Google Business Profile account. Sign in if you haven’t already.
2. Manage Locations
On the left-hand menu, click on “Manage Locations.” Find the location you want to set the service area for and click on it.
3. Edit Your Profile
In the left-hand navigation, click on “Info.” You will see various sections such as business name, address, and service areas.
4. Add Cities, Counties, or Postcodes
In the “Service Areas” section, click the pencil icon to edit. You can add cities, counties, postcodes, or even states where you provide services. For example, if you operate in multiple cities, you can add each city individually.
5. Apply Changes
After adding your service areas, click “Apply.” Your changes will be reviewed by Google and should be live within a few days. Google may need to verify these changes via a postcard sent to your physical address.
Managing Locations
Managing multiple locations can be tricky, but it’s essential for businesses that serve various areas. Here’s how you can streamline this process:
- Use Descriptive Labels: Label each location clearly to avoid confusion.
- Update Regularly: Keep your service areas updated to reflect any changes in your business operations.
- Monitor Performance: Track which locations are getting the most traffic and adjust your service areas accordingly.
Service Area Radius
Google no longer allows setting a service area as a radius around your business. Instead, you must specify individual cities, counties, or postcodes. This change ensures more precise targeting but requires a bit more effort.
Pro Tips for Setting Service Areas
- Be Specific: The more precise you are with your service areas, the better.
- Think Geometrically: When adding multiple areas, try to cover the outer edges first to form a clear boundary.
- Use Keywords: Include local keywords in your service area descriptions to improve search visibility.
By following these steps, you can ensure that your business is visible to customers in your target areas. This is crucial for local SEO and helps attract more clients to your service.
Next, let’s explore how to request ownership of an existing listing if your business already has one but you don’t have control over it.
Method 3: Request Ownership of an Existing Listing
Steps to Request Ownership
Sometimes, your business might already have a Google Business Profile (GBP) managed by someone else. If you’re authorized to manage it, you can request ownership from the current profile owner. Here’s how to do it:
1. Find the Business Profile
First, you need to locate the existing business profile. You can do this in two ways:
-
Google Search or Maps: Search for your business on Google Search or Google Maps. Under the Business Profile, click “Claim this business”.
-
Google Business Profile Website: Go to business.google.com/add. Enter your business name and address, then select it from the search results.
2. Click “Claim this business”
Once you find the profile, click on “Claim this business”. If you don’t see this option, you might already be an owner or manager. Look for a “You manage this business profile” badge.
3. Request Access
If the profile is already verified by someone else, you’ll see a message indicating that. Click “Request access” and fill out the form with your details. Be specific about your role and why you need access.
4. Submit the Request
Click “Submit” to send your ownership request. The current profile owner will receive an email asking them to contact you. You’ll also get a confirmation email.
Pro Tip: Keep an eye on your email for updates from Google.
5. Verification Process
The current profile owner has 3 days to respond. Here’s what can happen next:
- If Approved: You’ll get an email notification, and you can start managing the profile.
- If Denied: You’ll be notified by email. You can still suggest edits or appeal the decision.
- No Response: If there’s no response after 3 days, you might see a “Claim” or “Verify” button in your dashboard. Follow on-screen instructions to verify and claim the profile yourself.
Handling Ownership Conflicts
Sometimes, ownership conflicts arise. Here’s how to address them:
- Owner Conflict Dialog: If you encounter an “Owner conflict” dialog, it means the location is a duplicate. Click “Request access” to proceed.
- Appeal Denied Requests: If your request is denied, use the email link to appeal. Google will review your case.
Bulk-Verified Accounts
If you manage multiple locations (bulk-verified account), you can upload profile information via a spreadsheet:
- Upload Spreadsheet: Add all your business details and upload.
- Resolve Conflicts: Open the duplicate profile and click “Request access”.
Important Notes
- New Owner Limitations: New owners can’t delete or transfer ownership within the first 7 days.
- Monitor Requests: Check the status of your request by signing in to your Google Business Profile.
By following these steps, you can gain control over an existing business profile efficiently. This ensures your business information is accurate and helps improve your local SEO.
Next, let’s dive into optimizing your Google Business Profile to make the most of your listing.
Method 4: Optimize Your Google Business Profile
Best Practices for Optimization
Once you’ve claimed your Google Business Profile (GBP), optimize it. A well-optimized profile can significantly boost your visibility and attract more local customers. Here are some best practices to follow:
Complete Your Profile
Fill Out All Details
Make sure every section of your profile is complete. This includes your business name, address, phone number, website, hours of operation, and more.
- Consistency: Use the same format for your business name, address, and phone number (NAP) across all platforms.
- Accurate Info: Ensure your hours of operation are up-to-date. Businesses with accurate hours are 50% more likely to convert leads into customers.
Add High-Quality Images
Upload Appealing Photos
Photos can make your profile more engaging and trustworthy. Google states that listings with photos get 42% more requests for directions and 35% more website visits.
- Quality: Use high-resolution images that showcase your business, products, and services.
- Metadata: If possible, take photos at your business location. Google extracts metadata from photos to verify authenticity.
Encourage Customer Reviews
Gather and Respond to Reviews
Reviews are crucial for building trust and improving your local SEO. Encourage satisfied customers to leave reviews and always respond to them, whether positive or negative.
- Ask for Reviews: After a purchase or service, send a follow-up email thanking the customer and asking for a review.
- Respond Promptly: Address both positive and negative reviews. For negative reviews, offer to resolve the issue offline if necessary.
Pro Tip: Consumers value review responses. It shows you care about customer feedback.
Business Information
Keep Information Updated
Regularly update your profile to reflect any changes in your business. This includes changes in services, hours, or contact information.
- Special Hours: Update your hours for holidays, special events, or any other changes.
- Service Details: Add detailed descriptions of your services. Use keywords naturally, but avoid keyword stuffing.
Photos and Videos
Visual Content
Adding videos can further improve your profile. Videos are engaging and can provide a more in-depth look at your business.
- Video Content: Upload short, high-quality videos showcasing your services or products.
- Regular Updates: Keep your visual content fresh by regularly adding new photos and videos.
Optimize Your Description
Compelling Business Description
Your business description is your sales pitch. It should be clear, compelling, and include relevant keywords.
- Keywords: Use keywords naturally to describe what your business does.
- Unique Selling Points: Highlight what sets your business apart from the competition.
- Readability: Keep it simple and easy to read. Use bullet points for quick readability.
By following these best practices, you can make your Google Business Profile a powerful tool for attracting local customers and improving your local SEO.
Next, let’s explore the verification process to ensure your profile is fully authenticated.
Method 5: Verify Your Business
Detailed Verification Process
Verifying your Google Business Profile (GBP) is crucial. Without verification, your business won’t appear on Google Maps or local search results. Here’s how to do it:
Verification Methods
1. Postcard Verification
This is the most common method. Google will send a postcard to your business address with a verification code.
- Step-by-Step:
- Sign in to your GBP account.
- Enter your business address.
- Select “Mail” as your verification method.
- Wait for the postcard (it typically arrives within 1-2 weeks).
- Once received, log back into your GBP account.
- Enter the 5-digit verification code from the postcard.
- Click “Submit”.
Tip: Do not edit your business information while waiting for the postcard. This can cause delays.
2. Phone Verification
Some businesses can verify via phone. If eligible, this is a quicker option.
- Step-by-Step:
- Confirm your business phone number in your GBP account.
- Select “Verify by phone”.
- Google will send a verification code via SMS.
- Enter the code in your GBP account.
- Click “Submit”.
3. Email Verification
If available, email verification can be very convenient.
- Step-by-Step:
- Select “Verify by email” in your GBP account.
- Google will send a verification code to your business email.
- Enter the code in your GBP account.
- Click “Submit”.
4. Instant Verification
If you’ve already verified your business with Google Search Console, you might be eligible for instant verification.
- Step-by-Step:
- Sign in to your Google Search Console account.
- Link it to your GBP account.
- Follow the prompts for instant verification.
5. Video Verification
In recent years, Google has introduced video verification for added security.
- Step-by-Step:
- Select “Verify by video” in your GBP account.
- Follow on-screen instructions to record a short video showing your business location and operations.
- Submit the video for review.
Choose Verification Method
Selecting the right verification method depends on your business setup. Postcard verification is the default but can be slow. Phone and email are faster but not always available. Instant and video verification offer unique advantages if you qualify.
Follow On-Screen Instructions
Each verification method comes with specific steps. Follow the on-screen instructions carefully to avoid errors.
Confirm Verification
Once you’ve entered the verification code or completed the video, Google will confirm your business. This usually takes a few minutes but can sometimes take up to 24 hours.
Pro Tip: After verification, keep your business information updated. Accurate details improve your local search ranking and build customer trust.
Now that your business is verified, you can fully leverage your Google Business Profile to attract more local customers.
Next, let’s dive into some frequently asked questions about claiming a service area business listing.
Frequently Asked Questions about Claiming a Service Area Business Listing
How to Verify a Service Area Business on Google?
Verifying your service area business on Google ensures your business appears in local search results and on Google Maps. Here’s how to do it:
Verification Steps:
- Log into Your GBP Account: Sign in to your Google Business Profile account.
- Enter Your Business Details: Ensure your business name, address, and contact information are accurate.
- Choose a Verification Method: Options include postcard, phone, email, instant, or video verification.
- Follow On-Screen Instructions: Each method will have specific steps. For example, if you choose postcard verification, you’ll receive a code by mail which you’ll need to enter in your GBP account.
- Confirm Verification: Once you enter the code or complete the video, Google will confirm your business. This can take a few minutes to 24 hours.
Pro Tip: Keep your business information accurate and updated to improve your local search ranking.
How to Add a Service Area in Google My Business?
Setting your service area on Google My Business helps customers know where you provide services. Here’s how to do it:
Manage Service Areas:
- Log into Your GBP Account: Sign in and go to the dashboard.
- Steer to the Info Section: Click on the Info tab.
- Add Service Locations: Click the pencil icon in the Service Areas section. You can add cities, counties, states, or even countries where you provide services.
- Apply Changes: After adding the service areas, click Apply.
Pro Tip: Regularly update your service areas to reflect any changes in your business operations.
How to Claim Your Business Location on Google?
Claiming your business location on Google is essential for managing your online presence. Here’s how to do it:
Claim Business:
- Search for Your Business: Go to Google My Business and search for your business name.
- Select Your Business: If it appears in the search results, click on it.
- Request Ownership: Click on Claim this business and follow the prompts.
- Verification: Choose a verification method (postcard, phone, email, etc.) and follow the instructions to complete the process.
Mark as Permanently Closed: If you find a duplicate listing or an incorrect entry, you can mark it as permanently closed. This helps to avoid confusion and ensures customers find the correct information.
Suggest an Edit: If there are inaccuracies in your business listing, you can suggest an edit to correct the information. Steer to the business profile, click on Suggest an edit, and submit the changes.
By following these steps, you can effectively manage your service area business listing on Google, ensuring accurate information and improved visibility in local search results.
Next, let’s explore more advanced methods to optimize your Google Business Profile for better local search performance.
Conclusion
Claiming and optimizing your service area business listing on Google is essential for improving local search visibility and attracting more customers.
Summary of Key Steps:
-
Claim and Verify Your Business: Ensure your business appears in local search results and Google Maps by claiming and verifying your listing through methods like postcard, phone, email, or video verification.
-
Set Your Service Area: Define the geographic regions you serve to help potential customers know where you provide services. This can be done by navigating to the Info tab in your Google Business Profile and adding service locations.
-
Request Ownership of Existing Listings: If your business is already listed, request ownership to gain control. This involves verifying your business and possibly appealing if the current owner denies your request.
-
Optimize Your Google Business Profile: Complete your profile with accurate business information, high-quality photos, and customer reviews. This improves your online presence and builds trust with potential customers.
-
Regularly Update and Monitor Your Profile: Keep your business information current and respond to customer reviews to maintain a positive online reputation.
Benefits of Claiming Your Service Area Business Listing:
- Increased Visibility: Your business will appear in local search results and on Google Maps, making it easier for customers to find you.
- Improved Credibility: A verified listing builds trust with potential customers and shows that your business is legitimate.
- Improved Customer Engagement: By providing accurate information and responding to reviews, you can engage with customers and improve their experience.
- Competitive Advantage: Optimizing your listing can help you stand out from competitors and attract more local customers.
Why Choose D&D SEO Services?
At D&D SEO Services, we specialize in helping businesses claim and optimize their Google Business Profiles. Our comprehensive services include:
- Claiming and Verifying Listings: We handle the entire process, ensuring your business is properly claimed and verified.
- Setting Service Areas: We help you define and update your service areas to reflect your business operations.
- Profile Optimization: Our experts optimize your profile with high-quality images, accurate information, and engaging descriptions.
- Review Management: We assist in managing customer reviews to build a positive online reputation.
By partnering with us, you can ensure your business stands out in local searches and attracts more customers. Ready to take your local SEO to the next level? Contact D&D SEO Services today to get started!
By following these best practices, you can effectively claim and manage your service area business listing on Google, enhancing your local SEO and driving more traffic to your business.

